The MPU6050 is a popular and widely used accelerometer and gyroscope sensor that can measure motion and orientation. In this tutorial, we will learn how to interface the MPU6050 with the ESP32, a powerful microcontroller board, to obtain motion data and then use this data to visualize a cube using Qt, and since we are using Qt which is a cross-platform framework, we can easily develop an application for the Desktop environment and also for Android. The following image illustrates the Accelerometer Visualization on Windows Applications and on Android Phones.
 |
| Working Demo |
Requirements:
- ESP32 development board (If you don't have an ESP32 board then you can use any Arduino-based board, but just make sure to remove the Bluetooth prints from the code)
- MPU6050 sensor module
- Breadboard and jumper wires
- Arduino IDE (or you can use ESP-IDF also but I am not covering that)
Step 1: Wiring the MPU6050 to ESP32:
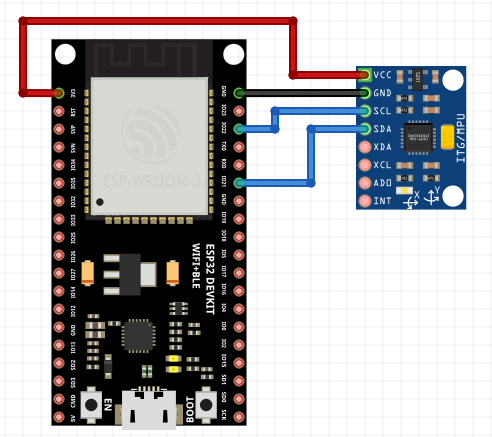
Start by connecting the MPU6050 sensor to the ESP32 development board. The MPU6050 communicates using the I2C protocol, so we will connect it as follows:
- Connect VCC to 3.3V (or 5V if your MPU6050 module supports it).
- Connect GND to the ground pin on the ESP32.
- Connect SDA to GPIO 21 on the ESP32.
- Connect SCL to GPIO 22 on the ESP32.
Step 2: Installing the Required Libraries:
To communicate with the MPU6050 and access its data, we need to install the necessary libraries. As we are using the Arduino IDE, open the Library Manager and search for "MPU6050." Install the library named "MPU6050_Light". This is not a hard requirement, you can use any other library of your choice, the ultimate aim is to send the "Roll" and "Pitch" values to the Serial Port and over Bluetooth, which will be used by Qt to visualize a cube 3D object.
 |
| Install MPU6050_Light Library |
Step 3: Setting up the Code:
Create a new sketch in the Arduino IDE. Begin by including the required libraries for the MPU6050 and I2C communication. Then, initialize the I2C interface and the MPU6050 sensor.
Step 4: Reading Data from MPU6050:
In the main loop of your code, read data from the MPU6050 sensor. You can obtain the accelerometer and gyroscope values in three axes (X, Y, Z) using appropriate functions from the MPU6050 library.
As shown in the below-mentioned code, I am just getting "Roll" and "Pitch" values and then transmitting these values to the PC using Serial Communication, and also sending the same value over Bluetooth communication, if your device doesn't support Bluetooth, you can skip this part.
To get the "Roll" the function "mpu.getAngleX()" is used and similarly to get the value of "Pitch" the function "mpu.getAngleY()" is used.
Step 5: Receiving this data with Qt and visualizing the MPU6050 sensor position with Qt (Windows)
Step 6: Receiving this data with Qt and visualizing the MPU6050 sensor position with Qt (Android)
Code Download
Some Other Project Ideas:
Now that you have successfully interfaced the MPU6050 with the ESP32, you can use the motion data in various exciting projects. Here are a few ideas to get you started:
- Create a motion-controlled robot or vehicle.
- Build a gesture-based controller for your computer or smart home devices.
- Develop a stabilizing platform for a camera or a quadcopter.
Conclusion:
Interfacing the MPU6050 with the ESP32 opens up a world of possibilities for motion-sensing projects. You can now accurately measure acceleration and rotation, enabling you to create a wide range of applications, from robotics to virtual reality. Experiment with the data, explore new ideas, and have fun building your projects!


No comments:
Post a Comment