A few days back, I ordered a cheap OLED Display (based on an SSD1306 controller), for one of my projects, and then for testing purposes, I used it with Arduino as it has lots of Libraries for this display.
Unfortunately, I am not able to find the libraries for Microchip PIC Micro-controller and that's why I decided to port the Arduino Libraries written in C++ to C and make my OLED display work with Microchip PIC Micro-controller.

Connection
This OLED Display comes in two sizes one is 128x64 and another is 128x32, the one shown above is 128x32, apart from this, the interface is either SPI or I2C, the one I am using works on I2C mode and this post will be dedicated to that only.
These displays generally have 4 or 5 pins, and the pin description is written over the pins. The pins are as follows.
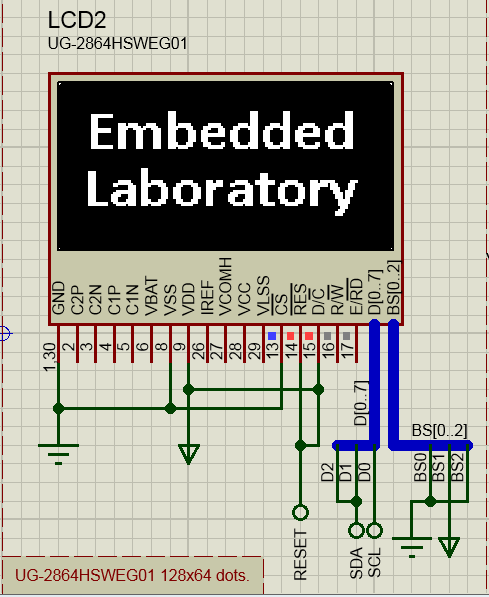
I am using PIC18F2550 for this, and the connection diagram is as follow.
As I have a 128x32 OLED display, so I will make sure that the same library works on both types of display (128x64 and 128x32). That's why I tested the 128x64 display in Labcenter Electronics Proteus and 128x32 on real hardware with the same library.
Unfortunately, I am not able to find the libraries for Microchip PIC Micro-controller and that's why I decided to port the Arduino Libraries written in C++ to C and make my OLED display work with Microchip PIC Micro-controller.

Connection
This OLED Display comes in two sizes one is 128x64 and another is 128x32, the one shown above is 128x32, apart from this, the interface is either SPI or I2C, the one I am using works on I2C mode and this post will be dedicated to that only.
These displays generally have 4 or 5 pins, and the pin description is written over the pins. The pins are as follows.
| Pin Name | Description |
|---|---|
| VCC | Power Supply Pin, 3.3V or 5V |
| GND | Power Supply Ground Pin |
| SCL | I2C Clock Line |
| SDA | I2C Data Line |
| RESET | Reset Pin (Optional), if present connect to 3.3V or 5V |
I am using PIC18F2550 for this, and the connection diagram is as follow.
 |
| Connection Diagram |
| Pin Name | Description |
|---|---|
| VCC | PIC 5V Supply |
| GND | PIC GND Supply |
| SCL | RB1 (Pin 22) |
| SDA | RB0 (Pin 21) |
| RESET | In Proteus to 5V and on my actual hardware this pin is not present |
Software
The software is written in mikroC for PIC compiler and can be used with MPLAB XC8 compiler also without many changes.
To communicate with the device connected to the I2C bus, you must know its address, in our case the address is 0x3D (as per the connection diagram shown above).
When the SSD1306 controller is working in I2C mode, the D/C pin of this controller decides the address, if it is connected with Ground, then the address is 0x3C and if connected with VCC, then its address is 0x3D.
Note:
The OLED Module which I purchased has address 0x3C as the D/C line is connected with the ground.
The following is the test software that displays images, text, lines, rectangle, and circles on this display.
#include "OLED_I2C.h"

void main()
{
  UART1_Init(9600);
  OLED_Init();
  Delay_ms(2000);
  OLED_ClearDisplay();
  OLED_Update();
  Delay_ms(1000);
  OLED_FillDisplay();
  OLED_Update();
  Delay_ms(1000);
  OLED_ClearDisplay();
  // Draw Single Pixel
  OLED_DrawPixel(10, 10, WHITE);
  OLED_Update();
  Delay_ms(1000);
  OLED_ClearDisplay();

  // Draw Many Lines
  test_draw_lines();
  OLED_Update();
  Delay_ms(1000);
  OLED_ClearDisplay();

  // Draw Vertical and Horizontal Lines
  test_draw_v_h_lines();
  OLED_Update();
  Delay_ms(1000);
  OLED_ClearDisplay();

  // Draw Rectangles
  test_draw_rectangles();
  OLED_Update();
  Delay_ms(1000);
  OLED_ClearDisplay();

  // Draw Circles
  test_draw_circles();
  OLED_Update();
  Delay_ms(1000);
  OLED_ClearDisplay();

  // Text
  test_text_display();
  OLED_Update();
  Delay_ms(1000);
  OLED_ClearDisplay();
  OLED_Update();

  // Image
  while(1)
  {
    test_images();
    OLED_Update();
  }
}

// Function Definitions
void test_draw_lines( void )
{
  uint8_t i;
  for ( i=0; i<OLED_Width(); i+=4)
  {
    OLED_Line(0, 0, i, OLED_Height()-1, WHITE);
    OLED_Update();
  }
  for ( i=0; i<OLED_Height(); i+=4 )
  {
    OLED_Line(0, 0, OLED_Width()-1, i, WHITE);
    OLED_Update();
  }
}
void test_draw_v_h_lines( void )
{
  uint8_t i;
  // Horizontal lines test
  for( i=0; i< OLED_Height(); i+=4 )
  {
   OLED_H_Line(0, OLED_Width()-1, i, WHITE);
   OLED_Update();
  }
  Delay_ms(1000);
  OLED_ClearDisplay();
  OLED_Update();
  // Vertical lines test
  for( i=0; i< OLED_Width(); i+=4 )
  {
    OLED_V_Line(0, OLED_Height()-1, i, WHITE);
    OLED_Update();
  }
}

void test_draw_rectangles( void )
{
  uint8_t i;
  for ( i=0; i<OLED_Height()/2; i+=2)
  {
    OLED_Rectangle(i, i, OLED_Width()-1-i, OLED_Height()-1-i, WHITE);
    OLED_Update();
    Delay_ms(250);
  }
  Delay_ms(1000);
  OLED_ClearDisplay();
  OLED_Update();
  for( i=OLED_Height()/2; i>0; i-- )
  {
    OLED_Rectangle(i,i, OLED_Width()-i, OLED_Height()-i, WHITE );
  }
}

void test_draw_circles( void )
{
  uint8_t i;
  for( i=0; i<OLED_Width()/2; i+=5 )
  {
    OLED_Circle(OLED_Width()/2, OLED_Height()/2, i , WHITE);
    OLED_Update();
  }
}

void test_text_display( void )
{
  OLED_SetFont( SMALL_FONTS );
  OLED_Write_Text(0,0,"ABCDEFGHIJKLMNOPQRSTU");
  OLED_Write_Text(0,8,"VWXYZ0123456789~!@#$%");
  OLED_Update();
  Delay_ms(1000);
  OLED_Write_Text(0,16,"abcdefghijklmnopqrstu");
  OLED_Write_Text(0,24,"vwxyz");
  OLED_Update();
  OLED_ClearDisplay();
  Delay_ms(1000);
  OLED_SetFont( TINY_FONTS );
  OLED_Write_Text(0,0,"ABCDEFGHIJLKLMNOPQRSTUVWXYZ");
  OLED_Write_Text(0,8,"abcdefghijklmnopqrstuvwxyz");
  OLED_Write_Text(0,16,"0123456789");
  OLED_Update();
  Delay_ms(1000);
  OLED_ClearDisplay();
  OLED_Update();
}

void test_images( void )
{
  OLED_Image(bank);
  OLED_Update();
  Delay_ms(1000);
  OLED_InvertDisplay(TRUE);
  OLED_Update();
  Delay_ms(1000);
  OLED_InvertDisplay(FALSE);

  OLED_Image(house);
  OLED_Update();
  Delay_ms(1000);
  OLED_InvertDisplay(TRUE);
  OLED_Update();
  Delay_ms(1000);
  OLED_InvertDisplay(FALSE);
  Delay_ms(1000);
}
The following video shows the output of the above program when flashed on the actual hardware.
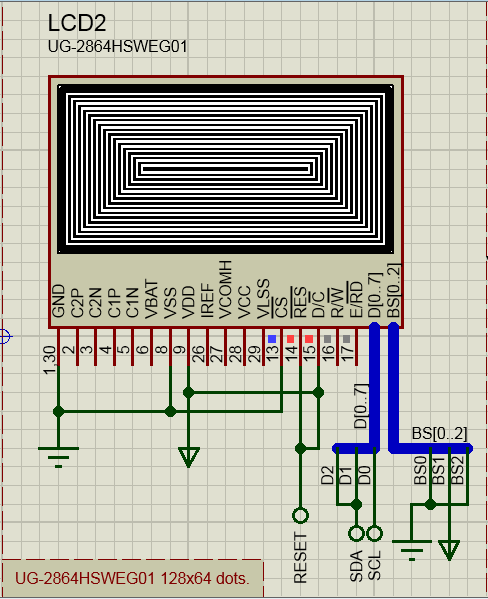
The following images are the snapshots taken from the actual OLED Display.


The following are the snapshots taken from the Labcenter Electronics Proteus.
 |
| Image Display |
 |
| Single Pixel Turn-On |
 |
| Lines Display |
 |
| Horizontal Lines Display |
 |
| Vertical Lines Display |
 |
| Rectangles Display |
 |
| Circles Display |
 |
| Small Fonts Display |
 |
| Tiny Fonts Display |
 |
| Image Display |
Version 1.0: Initial Release
Features:
- For displaying text and numbers only two fonts are supported TINY_FONTS and SMALL_FONTS
- The following functions are added.
void OLED_Init( void );
uint8_t OLED_Width( void );
uint8_t OLED_Height( void );
void OLED_Update( void );
void OLED_SetContrast( uint8_t contrast );
void OLED_ClearDisplay( void );
void OLED_FillDisplay( void );
void OLED_DrawPixel( uint8_t x, uint8_t y, uint8_t color);
void OLED_InvertDisplay( uint8_t value );
void OLED_SetFont( const uint8_t *font);
void OLED_InvertFont( uint8_t invert_status );
void OLED_Circle( int8_t x_center, int8_t y_center, uint8_t radius, uint8_t color);
void OLED_Line( int8_t x_start, int8_t y_start, int8_t x_end, int8_t y_end, uint8_t color);
void OLED_V_Line ( uint8_t y_start, uint8_t y_end, uint8_t x_pos, uint8_t color);
void OLED_H_Line( uint8_t x_start, uint8_t x_end, uint8_t y_pos, uint8_t color);
void OLED_Rectangle( uint8_t x1, uint8_t y1, uint8_t x2, uint8_t y2, uint8_t color);
void OLED_FillRectangle( uint8_t x1, uint8_t y1, uint8_t x2, uint8_t y2, uint8_t color);
void OLED_Triangle(uint8_t x0, uint8_t y0, uint8_t x1, uint8_t y1, uint8_t x2, uint8_t y2, uint8_t color);
void OLED_Circle( int8_t x0, int8_t y, uint8_t r, uint8_t color );
void OLED_Image( const uint8_t *image);
void OLED_Write( uint8_t x, uint8_t y, uint8_t value );
void OLED_Write_Text(uint8_t x, uint8_t y, uint8_t *text);
2nd Feb 2020: Project Updated on GitHub
Based on the request I received on my YouTube videos and here and over emails, I am hosting this project now on GitHub. Now, this is based on MPLABX and XC8 compilers.
The good thing is that you can report issues there directly.
Download Source From GitHub


in which library this function is ?
ReplyDeleteUART1_Init(9600)
Can you please share the library ?
Thanks
Hi Marzook,
DeleteThis project is developed using mikroC and this function is inbuilt function, you can select the library in library manager of mikroC.
You can also remove this line, as it was added by me for debugging purpose and is not used in the above program.
Thanks for your replay
DeleteIam using MPLABX IDE
And I coded for 128x32 OLED
So there comes the limitations, currently this library will work directly on mikroc only.
DeleteAnd it will work on MPLAB X and xc8 with few modifications only.
Can I ask for a library and example for SSD1306 for MPLAB X IDE XC8?
DeleteBest regards,
M
Okay
DeleteBased on so many requests I will create a simple project which uses the MPLABX and xc8 compiler.
By next weekend you will get the library.
Thank You :)
DeleteSorry for Delay, MPLABX XC8 Example Updated on GitHub
DeleteGitHub Link: https://github.com/xpress-embedo/PIC-OLED
Git Clone: https://github.com/xpress-embedo/PIC-OLED.git
Could you be able tohelp me? I'm trying to simulate this with proteus but I can't make it work:(
ReplyDeleteProteus Project is also included so you should be able to run this out of the box.
DeleteBy the way what problem you are facing??
Provide me detailed explanation and I will try to help you.
Contact us at matlab.acdemy@gmail.com with complete details.
Can I ask you something? How can I learn to do these libraries? I can't get nowhere when there's no library for some instruments. Thanks in advance for you response
ReplyDeleteI already replied to this question over email :-)
DeleteI don't know why this question was written in here, I did it in the Contact section, thanks for your fast reply
DeleteHELLO I WANT TO KNOW HOW TO DO THIS SAME PROJECT BUT IN MPALB XC8 Thanks
ReplyDeleteI received the same request from so many guys, some of them commented and some of them mailed me. I am busy these days and that's why not able to do this simple task.
DeleteBut I would like to give you guys a basic idea.
http://embeddedlaboratory.blogspot.in/2016/07/ds1307pcf8523-interfacing-with.html
Have a look this project, use the I2C library from this project, and create a new project in MPLABX IDE with MPLAB XC8 Compiler.
One can use OLED Library directly without any changes, only update the I2C functions from the above posted link.
By the end of this month I will get sometime and I will try to post the library here.
Hi,
DeleteDid you ever get a chance to post the MPLAB IDE XC8/XC16 library version?
Sorry for Delay, MPLABX XC8 Example Updated on GitHub
DeleteGitHub Link: https://github.com/xpress-embedo/PIC-OLED
Git Clone: https://github.com/xpress-embedo/PIC-OLED.git
Which Arduino library did you use to convert to mikroc? Have you link for it? I want to see how you did it
ReplyDeletecan u do the tutorial step by step how can I get the LCD circuit SSD1306 in proteus..I search for UG-28xxxxx as in the picture but not found..sorry i'm soo beginner . hope you can help me
ReplyDeleteFile --> Import Project Clip --> Arduino --> Arduino SSD1306 128x64 Graphics Display I2C Breakout Board
DeleteHello, i want to modify this code for MPLAB X but from where can i get the content of " #include "OLED_I2C.h" " ? Thank you for your time!
ReplyDeleteSorry for Delay, MPLABX XC8 Example Updated on GitHub
DeleteGitHub Link: https://github.com/xpress-embedo/PIC-OLED
Git Clone: https://github.com/xpress-embedo/PIC-OLED.git
Hello. Fine library, congrats! please can you guide me to get some larger fonts? Regards, de Ricardo.
ReplyDeleteDid you ever get a chance to finish the MPLAB download?
ReplyDeleteSorry for Delay, MPLABX XC8 Example Updated on GitHub
DeleteGitHub Link: https://github.com/xpress-embedo/PIC-OLED
Git Clone: https://github.com/xpress-embedo/PIC-OLED.git
I apologize for how little I understand about software design but I am having some issues using this download. This is basically exactly what I need to do with my SSD1306 controlled OLED Display. I am trying to reverse engineer the library files and determine how and which files to upload to MPLAB. I am very unfamiliar with the program and have only used Arduino's to program these kinds of systems. Going into MPLAB which files are put where to allow the program to call defined functions?
ReplyDeleteSorry for Delay, MPLABX XC8 Example Updated on GitHub
DeleteGitHub Link: https://github.com/xpress-embedo/PIC-OLED
Git Clone: https://github.com/xpress-embedo/PIC-OLED.git
Could you please share the library...for xc16 or XC8 in mplabX...
ReplyDeleteSorry for Delay, MPLABX XC8 Example Updated on GitHub
DeleteGitHub Link: https://github.com/xpress-embedo/PIC-OLED
Git Clone: https://github.com/xpress-embedo/PIC-OLED.git
Hi, in its protoboard I did not find pull-up resistors. is using? I'm not getting it to work with the PIC18F4550. It works only on Proteus.
ReplyDeletesame problem here, with same pic. Did you solve it?
DeleteFU**ING MIKROCHIP!!! You can't include the files on the same project because it recognize the files as duplicated. GRRRRRR!
ReplyDeleteBut it's working. EXCELLENT JOB!
can uou share the oled ssd1306 mikroc library ???
ReplyDeletePlease read the post, download links are available from where you can download the complete project.
DeleteGitHub Link: https://github.com/xpress-embedo/PIC-OLED
DeleteGit Clone: https://github.com/xpress-embedo/PIC-OLED.git
HELLO, could you help me to insert bigger font? try to download other font from the internet but do not print them.
ReplyDeleteThank you
Is this library works on mplab ?
ReplyDeleteSorry for late response.
DeleteYes this will work, you have to perform little bit modification on this library to tweak it for xc8 compilers. (and also you have to write i2c drivers also)
Sorry for Delay, MPLABX XC8 Example Updated on GitHub
DeleteGitHub Link: https://github.com/xpress-embedo/PIC-OLED
Git Clone: https://github.com/xpress-embedo/PIC-OLED.git
Is this library works on mplab
ReplyDeletecan you please share the library for xc8??
ReplyDeleteThank you. It really helped for me.
ReplyDeleteGlad to hear that :-)
DeleteCan you please share the mplab version? Thanks !
ReplyDeleteSorry for Delay, MPLABX XC8 Example Updated on GitHub
DeleteGitHub Link: https://github.com/xpress-embedo/PIC-OLED
Git Clone: https://github.com/xpress-embedo/PIC-OLED.git
Can you please share the mplab version? Thanks!
ReplyDeleteSorry for Delay, MPLABX XC8 Example Updated on GitHub
DeleteGitHub Link: https://github.com/xpress-embedo/PIC-OLED
Git Clone: https://github.com/xpress-embedo/PIC-OLED.git
hi, thanks for the library. What needs to be done to make it suitable for 0.49" 64 x 32.
ReplyDeleteI tried modifying the size of the buffer, but that didn't work
A simple trick will be to enable
Delete#define SSD1306_128_32
And dont display after 64.
But you can tweak the software to add a new display with supported configuration.
Hello!
ReplyDeleteFirstly thanks for sharing your good work. I adapted your library to XC8 and it works great, but now I need to know how to create new fonts to add to the library. The provided ones are too smmall for my application. Can you please explain how to create new fonts? Best wishes, Paul.
Hello Paul
DeleteI am glad you did that. But just to update you that this is already done, in the month of feb 2020 (mentioned in the blog post).
The library is now available on Github and complete project.
Project Link: https://github.com/xpress-embedo/PIC-OLED
OLED Library: https://github.com/xpress-embedo/OLED
I updated the library to include one 16x16 font, I have tested this and it works well.
I hope this is okay for you.
If you want to use more fonts according to your needs, check the below link.
http://www.rinkydinkelectronics.com/r_fonts.php
The fonts generated will work directly without any changes required.
Thanks.
Hi,
ReplyDeleteMy PIC has RC3 and RC4 as SCL/SDA inputs instead of the RB0 and RB1 inputs - where do i change this in the I2C code?
Thank you!
hello, do you have a library for the xc16, or pic24 available?
ReplyDeleteSorry I don't have, I don't work on PIC24 and using XC16 compiler.
DeleteBut, based on this code, it should be easy for you to convert this for PIC24.
For further queries, contact "laboratoryembedded@gmail.com"