Hello! Everyone, in this post i will show you how we can use OpenCV with Qt MinGW compiler. Before proceeding further, i would like to say that, please follow all the steps properly, otherwise you will not be able to run OpenCV with Qt.
Those who are using 64-bit Windows OS and Qt 5.8.0 for Windows 32-bit (MinGW 5.3.0, 1.2 GB), can directly use the libraries build by me to save the time, by clicking here.


Those who are using 64-bit Windows OS and Qt 5.8.0 for Windows 32-bit (MinGW 5.3.0, 1.2 GB), can directly use the libraries build by me to save the time, by clicking here.

So now let's get started.
Software Required:
- Qt with MinGW Compiler (Latest Version while writing this post is 5.8.0)
- CMake (Latest Version while writing this post is 3.8.0)
- OpenCV (Latest Version while writing this post is 3.2)
Download and install all these software's, just make sure that, don't install Qt and OpenCV in folders with white spaces.
Installing Qt and CMake is straight forward, you just have to click on accept, next and finish button, whenever you saw them.
Extracting OpenCV libraries is also simple, just click on the executable file and provide the path of C:, this is shown in image given below.
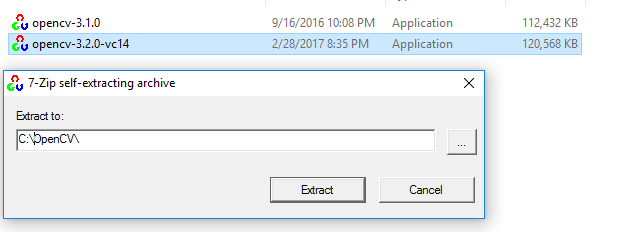 |
| Extract OpenCV into C Drive |
You may thing that OpenCV works directly without much problem with Python then why not with Qt, that's because the libraries of OpenCV are pre-built for Python and are not built for Qt by default, but i have read in various forums that it always better to build libraries for your system whether you are using Python or Qt or any other environment. So, this is main reason we have to follow the long steps which are demonstrated in the video given below and are also given below in points form.
Steps:
- The first step is to update the environment variables for MinGW Compiler location under Qt, the paths are as follow:
"C:\Qt\Qt5.8.0\5.8\mingw53_32\bin"
"C:\Qt\Qt5.8.0\Tools\mingw530_32\bin"
 |
| Update Environment Variables |
- Now open the folder where we have extracted the OpenCV libraries and create a new folder "release", this folder will contains the OpenCV libraries which we are going to build for Qt.
 |
| Create a folder "release", this contains all the OpenCV libraries build for Qt |
- Now open CMake, and in the source code provide the path of OpenCV source libraries "C:\OpenCV\opencv\sources" and in where to build binaries provide the path of the folder which we created in last step "C:\OpenCV\opencv\release"
 |
| Update Source and Build path in CMake |
- The next step is to configure the CMake for Compiler, in our case we are using MinGW Compiler and will select MinGW Makefiles. So click on "Configure" button and the "Select Native Compiler" and then select "MinGW Makefiles"
 |
| Select MinGW Makefiles |
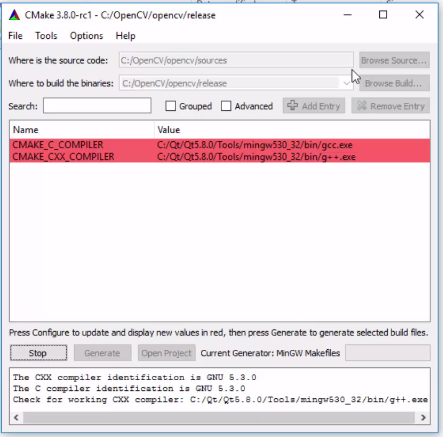
- Next step is to update the compiler path, C Compiler path is "C:\Qt\Qt5.8.0\Tools\mingw530_32\bin\gcc" and C++ compiler path is "C:\Qt\Qt5.8.0\Tools\mingw530_32\bin\g++"
 |
| Update Compiler Path. |
- After configuring compiler path, CMake will configure and you will see the following screen on your PC, wait for it to get completed.
 |
| CMake configuring |
- Once the configuration is completed, you will see the following screen on your PC
 |
| Configuration Completed |
- Now type "qt" in the search bar and check the value as shown below.

- Now type "cmake" in search bar and update the CMAKE_BUILD_TYPE value to "Release", as shown below.
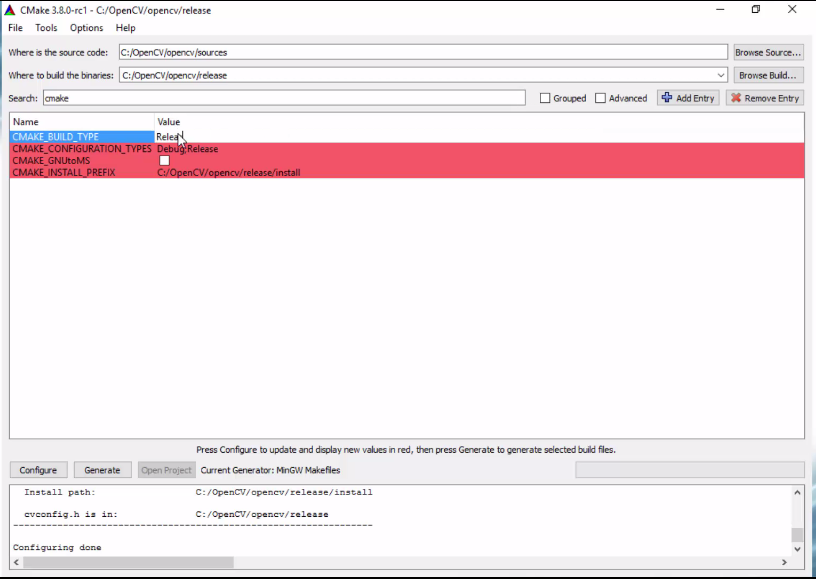 |
| Update CMAKE_BUILD_TYPE |
- Now after this step, click on "Configure" button and once configuration is completed, click on "Generate" button, when this gets completed you will see that lots of files are present in the "release" folder created above.
 |
| Files generated in release folder |
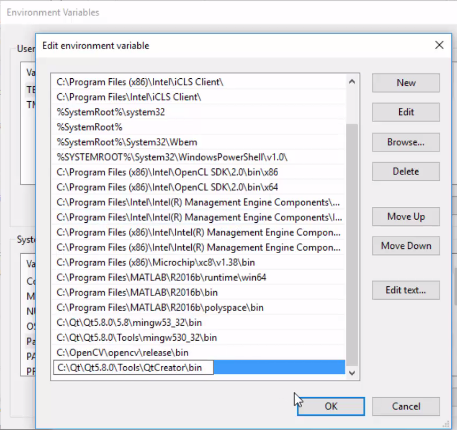
- Now again we have to update the path in Environment variables, so add the following paths:
"C:\OpenCV\opencv\release\bin"
"C:\Qt\Qt5.8.0\Tools\QtCreator\bin"
- Now we have to generate libraries of OpenCV so that we can use them with Qt, for that we have to open the command prompt and go to the release folder which we have created, one simple way to open command prompt in release folder is to press and hold the Shift key and press right click inside the release folder in Windows Explorer, this will include the "Open Command Window Here", click on this and command prompt will open in the release folder. Now type the command "mingw32-make" and after typing this command building gets started, on my PC i3 processor and with 8GB RAM it almost took 30-40 minutes to complete this step.
 |
| Start Building |
- Once building gets finished you will see the following screen on your command prompt and after that type the following command "mingw32-make install".
 |
| Building completed |
- Once installation is finished you will see the following screen on your command prompt, and now you can close your command prompt.
 |
| Installing Finish |
- We now have compiled libraries, which we can use with Qt and use OpenCV functions.
 |
| Compiled Libraries |
- Now its time to use these libraries in our Qt project, so create a new Qt project and update the project file "*.pro" of Qt project to include the header files and compiled libraries as follow:
INCLUDEPATH += C:\OpenCV\opencv\release\install\include
LIBS += C:\OpenCV\opencv\release\bin\libopencv_core320.dll
LIBS += C:\OpenCV\opencv\release\bin\libopencv_highgui320.dll
LIBS += C:\OpenCV\opencv\release\bin\libopencv_imgcodecs320.dll
LIBS += C:\OpenCV\opencv\release\bin\libopencv_imgproc320.dll
LIBS += C:\OpenCV\opencv\release\bin\libopencv_calib3d320.dll
 |
| Update Project File to include Libraries |
- Now write the following program in main.cpp to open an image.
#include <iostream>

#include <opencv2/opencv.hpp>
#include <opencv2/imgproc.hpp>
#include <opencv2/highgui.hpp>
using namespace std;
using namespace  cv;
int main()
{
    Mat image;
    char keyPress;
    cout << "Welcome to Qt\n";

    // Read Image
    image = imread("D:\\QtOpenCV.jpg", IMREAD_COLOR );
    // Show Image
    imshow("OpenCv and Qt", image);
    while(1)
    {
        keyPress = waitKey();
        // Press q key to Close Window
        if (keyPress == 'q')
        {
            destroyAllWindows();
            break;
        }
    }
    return 0;
}
After running the above program, we get the following output. (I opened the image of my videos thumbnail)
 |
| Program Output |
I hope you all like this post and if you face any problem please write in comment box or mail to us directly.


I've referred to this page at least a dozen times. Thank you so much for forging the path!
ReplyDelete