Hello Everyone, today I am back with one exciting project of simulating key-press just using PIC micro-controller, the best thing is that, we are going to make a device similar to USB keyboard (USB HID Class Device).


key_emulator_init: This function initializes HID Communication Library.
key_emulator_send: This function sends single key-press to the PC.
key_emulator_text: This function is to send multiple key-press to PC, at the bottom level this function uses the above function.
The following is the main program.
After flashing the above program in the StartUSB board, i quickly opened the Notepad, to check what keys are pressed, and the output of the program is as follow.
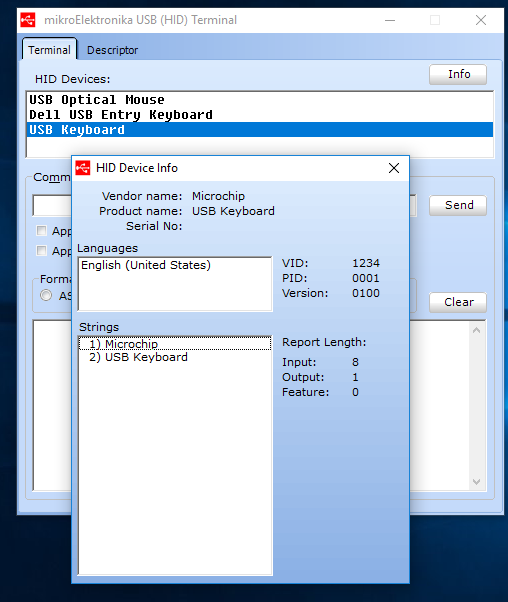
 You can also check the device information in the device manager, it will be listed as HID Input Device, the following image was taken from HID Terminal Information Setting, and as can be seen clearly that the same values are appearing which we have specified in HID Descriptor tool.
 Note:
Note:
You have already read why I worked on this project, but it's not like, that I want to help my friends to cheat the Software Tracking tool, but the ultimate aim of mine is to check if the Tracking Tool will be able to detect such kind of devices or not, right now it's not able to detect this device and treating like that employee is working continuously.
This project can be used in the other areas such as:
Automation: Certain repetitive things can be automated by this project and that will help someone to execute their day to day task effortlessly.
USB Keyboard: If keys are connected to this device then a customized USB keyboard can also be created using this simple project as base project.
And now comes the most important thing, :-) the complete source code.
Click Here to get the complete source code from GitHub.
Project Idea
Actually few of my friends works in a company, where they have started tracking the daily activities of employees using some dedicated software's. They track everything, like for how much time, they have spend on Skype chatting with friends, how much time they spend on actual work related tools like that.
And based on the tracking details, the software calculates the actual amount of work done by employee and this information is also shared with their managers.
They don't have any idea how to handle this situation, and from here I got an idea to make a simple device which looks like a USB keyboard to PC and sends some random commands pre-programmed in it, by this the tracking software's will think that the employee is doing their work, but actually it's the device which is automatically sending the key-press to PC.
Video
Video
Watch the following video or read the post given below.
I am using the StartUSB Board for this purpose, which already have PIC18F2550 micro-controller and it also comes with USB HID Bootloader to upload the program without any programmer.
Having this board is not mandatory and you can use any PIC board of your choice having in-built USB support.
With this StartUSB board and the program written in mikroC, I will simulate the key presses just like our USB Keyboard.
Description
With this StartUSB board and the program written in mikroC, I will simulate the key presses just like our USB Keyboard.
Description
Follow the following steps.
1) Open mikroC for PIC Micro-controller and create a blank project by selecting PIC18F2550 micro-controller.
2) Once the project is created edit the configuration settings of the project as shown below.

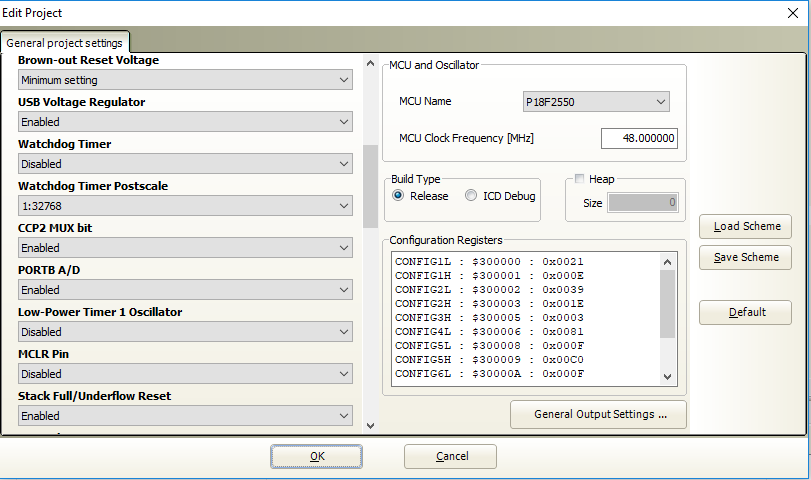
The following things can be observed from the above set of configuration.
* PLL Prescalar Selection is set to Divide By 2, reason for this is that, PLL used 4MHz input, and StartUSB Board has 8MHz External Oscillator, that's why to feed it to input of PLL, it is divided by 2.
* USB Clock Source is selected from the Output of PLL divided by 2, which means 48MHz.
* Oscillator Mode is HC with PLL Enabled.
* USB Voltage Regulator is Enabled.
3) mikroC for PIC comes with in-built USB HID and also has a tool to generate USB descriptor file. Tools -> HID Terminal
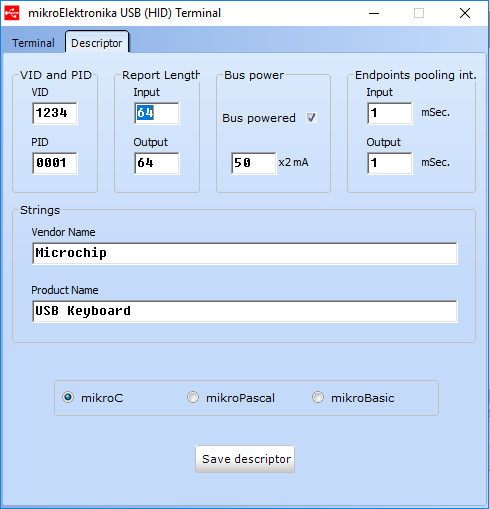
Use the above GUI based tool to change the settings or you can go ahead with the default settings also, just don't forget to enter/change the Vendor and Product Name, save the Descriptor file, this will automatically generate the *c code.
4) Next step you have to add this automatically generated descriptor file into your mikroC project. The Descriptor file generated is very basic in nature and is used for simple HID project. This file can't be used for USB Keyboard, so as a next step, we have to modify the descriptor file to make the system work like the USB HID Keyboard.
5) Download the USB HID Tool by clicking on this link.
6) Open the tool and then click on File -> Open and open the keyboard.hid file.

The above image clearly shows the "Report Descriptors" to be used for USB HID Keyboard, now we have to modify the mikroC automatically generated descriptor file with the above values. (This is a easy task, just double check that you have entered all values correctly)
7) The basic setup is done, now it's time to copy and the library which I have written to send the key press to PC using the StartUSB board.
The library only consist of the following three functions.
The library only consist of the following three functions.
// Function Prototypes
void key_emulator_init( void );
void key_emulator_send( char value );
void key_emulator_text( char* text );
key_emulator_init: This function initializes HID Communication Library.
key_emulator_send: This function sends single key-press to the PC.
key_emulator_text: This function is to send multiple key-press to PC, at the bottom level this function uses the above function.
The following is the main program.
#include "keypress_emul.h"

void interrupt()
{
  // USB Servicing is done inside the interrupt
  USB_Interrupt_Proc();
}

void main()
{
  // Initialize USB for Keypress Emulation
  key_emulator_init();
  key_emulator_text("/*");
  key_emulator_text("\tKeyboard Emulator Program\r");
  key_emulator_text("\tabcdefghijklmnopqrstuvwxyz\r");
  key_emulator_text("\tABCDEFGHIJKLMNOPQRSTUVWXYZ\r");
  key_emulator_text("\t0123456789\r");
  key_emulator_text("\t`~!@#$%^&*()_+-=,./;'[]\\<>?:\"{}|\r");
  key_emulator_text("\t################################n");
  key_emulator_text("*/\r\r");
  // Write a Simple Program
  key_emulator_text("#include <stdio.h>\r");
  key_emulator_text("void main()\r");
  key_emulator_text("{\r");
  key_emulator_text("\tprintf(\"Hello World\");\r");
  key_emulator_text("}\r");
  while(1)
  {
  }
}
After flashing the above program in the StartUSB board, i quickly opened the Notepad, to check what keys are pressed, and the output of the program is as follow.

You have already read why I worked on this project, but it's not like, that I want to help my friends to cheat the Software Tracking tool, but the ultimate aim of mine is to check if the Tracking Tool will be able to detect such kind of devices or not, right now it's not able to detect this device and treating like that employee is working continuously.
This project can be used in the other areas such as:
Automation: Certain repetitive things can be automated by this project and that will help someone to execute their day to day task effortlessly.
USB Keyboard: If keys are connected to this device then a customized USB keyboard can also be created using this simple project as base project.
And now comes the most important thing, :-) the complete source code.
Click Here to get the complete source code from GitHub.


Great Info!! thanks for sharing.
ReplyDeleteGlad to hear that :)
DeleteWOW! Nice article and writing style is also so good. Thanks for Sharing.
ReplyDeleteNepali Patro
Welcome :-)
DeleteAwesome post with great piece of information. I'm glad that I came across your blog. Keep us updated.
ReplyDeleteIoT Training in Chennai
IoT Courses in Chennai
Oracle Training in Chennai
Oracle Training institute in chennai
Unix Training in Chennai
Unix Shell Scripting Training in Chennai
IoT Training in Adyar
IoT Training in Porur
Good Post! Thank you so much for sharing this pretty post, it was so good to read and useful to improve my knowledge as updated one, keep blogging.Embedded Design
ReplyDeleteHello.
ReplyDeleteGreat project!
I want to use the PIC18F14K50 microcontroller in your project of the keyboard emulator, I am a beginner and do not quite understand how to do this. Please tell me, is this possible and how to do it?
Thank you in advance for your reply.
no sale el enlace del codigo
ReplyDeleteI checked the link and it's working well. The code is available on GitHub.
Deletehttps://github.com/xpress-embedo/Keypress_Emulator