Hello Everyone,
In today's post, I will show you how one can update the AT firmware in your ESP8266 module. Now, there might be questions in your mind that why we wanted to update the ESP8266 WiFi firmware when the current one is already working fine.
So, in my case, the reason is that the WiFi module which I received has the firmware from 2016 which is pretty old and some of the AT commands are not working, since during 2016 those commands were not available. There are always the benefits of updating the firmware to the latest version. Below are some of the benefits which I can think of as of now.- New Firmware has more features.
- New Firmware has bug fixes and hence is more stable.
- Sometimes we messed up & put some wrong SW & hence wanted to restore everything to normal.
Updating the firmware in ESP8266 is a really painful process if you don't know the correct steps, in this post and the video I embedded in this post is the latest as of in 2021, and I tried to cover all the steps so that you don't face any problem in updating the firmware, so let's get started.
The video is as below.
I recommend watching the video as compared to reading this text, as I think watching the video is more helpful.
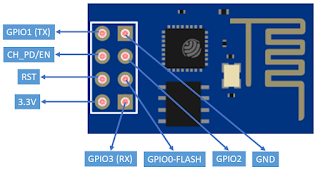
The following is the pin-out of the ESP8266 WiFi module. |
| Pin-Out of ESP8266 Module |
- ESP8266 WiFi Module (Of course you need this :-) )
- USB to Serial Converter
- Male to Female Cables
- Mechanical Switches
ESP8266 WiFi module firmware is updated over UART so that's why we need USB to UART converter, and cables or mechanical switches are needed to short the FLASH and RST pin to ground pin, this can be done neatly with the mechanical switches and cables, so it's up to you, how you wanted to do it.
The following are the connection, which you have to do.
 |
| Connection for Updating Firmware |
Once the connections are done, as a next step download the required tools and firmware from the ESPRESSIF website.
Download Link: https://www.espressif.com/en/support/download/all
Download the "Flash Download Tool" current version is v3.8.5
Download the AT Command Firmware which is "ESP8266_NonOS_AT_Bin_V1.7.4"
Once this downloading of software is done, as a next step, we have to determine which SPI flash is present on our module, whether it is 4Mbit or 8Mbit or 16Mbit , etc.
This we can do easily with the help of "Flash Download Tool", the following are the steps to determine the SPI flash present on your module.
- Connect RST and FLASH pin with the ground and connect the module with USB to UART module with the USB port
- Open the "Flash Download Tool", make sure the "SPIDownload" tab is selected and all the check-boxes are unchecked.
 |
| Flash Download Tool |
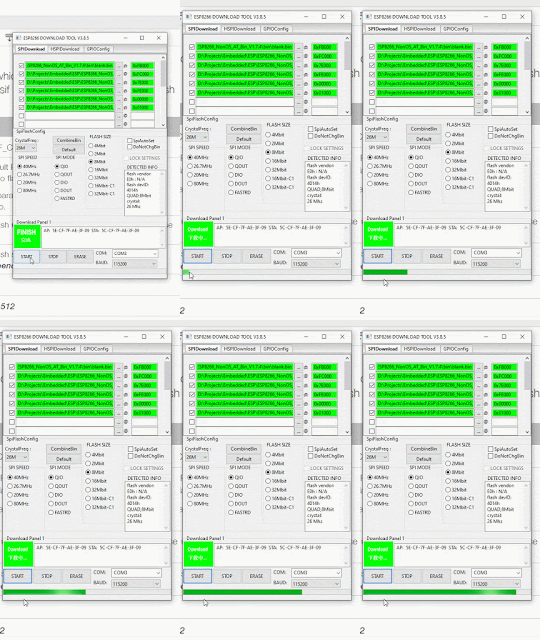
- Once you do the above step, you will see that the "Flash Download Tool" has fetched some important information from your module, which includes, Flash Size, Crystal Frequency, Access Point MAC address, and Station Mode MAC Address, as can be seen in the below image.
 |
| Module Information |
 |
| ESP8266 AT Command Document |
 |
| Copy Address from Documents to Flash Tool |
- Make sure your RST and Flash Pins are connected with Ground, and now press the start key.
- On Command Prompt you will see some dots and dashes, and now you can disconnect the RST pin from the Ground, and after doing this your programming is completed.
The firmware update is done, and now you can disconnect the RST and Flash Pin from the ground (RST is already disconnected), remove the USB to Serial Converter module from the USB port, and connect it back again.
Now with the help of serial terminal utility like HW Hercules test whether the firmware is updated correctly or not, this can be done with the help of AT+GMR command, as can be seen in the below screenshot, we are getting version 1.7.4.0, this is the same as what is programmed into the module.
 |
| Testing Updated Firmware |
As mentioned earlier, I have used Arduino Mega and ESP8266 module, and using these two I have connected with the Open Weather Map website to get the data of some cities and display them on an OLED screen.
Youtube:


No comments:
Post a Comment